Found something useful? Don't forget to leave a comment!


Tuesday, July 22, 2008

Cracking Windows Passwords with Rainbow Tables Using ophcrack

In my earlier post, Retrieving Windows Passwords Through Backtrack 3, I outlined the process of obtaining the Windows login password hashes. Obviously, those hashes are encrypted, so naturally we come to the next step - password cracking. There are several methods of attacking password hashes:

  • dictionary attack - run the contents of a wordlist against a password hash for matches
  • brute force attack - compute and try all possible password combination and see if it matches your hash
  • hybrid attack - combines dictionary and brute force methods (permutating the wordlist)
  • rainbow tables - trades off disk and memory space for time: all possible combinations are precomputed and stored in large files, which can be rapidly scanned to find a match for the hash

For the vast majority of Windows passwords, rainbow tables work great. ophcrack is a great n00b-friendly solution as the client is small and easy to install; additionally, rainbow tables for alphanumeric tables are freely available and are claimed to have a 99.9% success rate.

  1. Step 1 - Download and install the ophcrack client + tables.
    1. http://downloads.sourceforge.net/ophcrack/ophcrack-win32-installer-3.0.1.exe
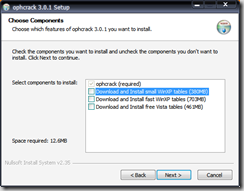
    2. At the tables download screen, download:
      1. WinXP small (380MB) if you have less than 512MB of RAM and want to crack LM hashes
      2. WinXP large (703MB) if you have more than 512MB of RAM and want to crack LM hashes
      3. Vista tables (461MB) if you want to crack NTLM hashes (default hash type on Vista)
      4. oph_install1
      5. Note: You may also manually download and install the table files
  2. Step 2 - Check ophcrack settings
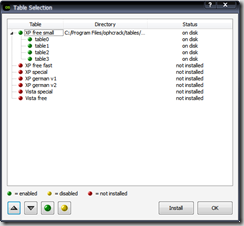
    1. Open ophcrack and check the Tables button and the Preferences tab.
    2. Ensure that the table(s) you downloaded are enabled with a green icon.
    3. oph_tables 
    4. In Preferences, ensure that the number of threads is equal to the number of processor cores you have.
  3. Step 3 - Load the password hashes.
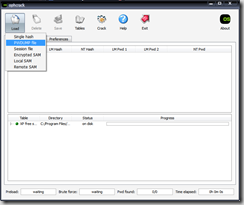
    1. If you used my Linux-based dumping procedure or a tool such as pwdump or fgdump, select PWDUMP file from the Load button.
    2. oph_load 
    3. You may also input a single hash or load the SAM from the local computer.
  4. Step 4 - Begin cracking!
    1. This is the easy step - once the hashes are loaded, simply press Crack. If all goes well and the passwords are alphanumeric only, you should have the decrypted password under the NT Pwd column within 10 minutes or so.
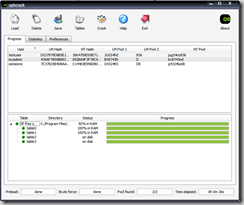
    2. Here is a screenshot of some successfully decrypted passwords - three simulated, relatively strong passwords that were cracked in only 26 seconds using the XP small tables on a machine with 1GB RAM.oph_cracked

It is a common belief that the NTLM hash algorithm is much more secure than the older LM algorithm used in Windows 2000 and XP. However, the ready availability of the Vista/NTLM rainbow tables puts this oudated belief to rest. With rainbow tables, even attackers with run-of-the-mill PCs can mount an effective attack against Windows passwords. GUI tools like ophcrack only simplify such efforts. Advice for the whitehats and the security-minded? Use a long password - on Windows 2000/XP, NTLM must be used if the password exceeds 14 characters due to limitations in LM. Furthermore, long passwords deter brute force attacks. Make sure you don't use a common word in your password, as this is easy prey for dictionary attacks.

Additionally, use a symbol or two in your password, as this will automatically render alphanumeric-only rainbow tables useless. Similarly, brute-force and dictionary attacks will be made much more difficult due to the vastly expanded search space.

From a larger perspective, we again demonstrate the weaknesses of Windows password hashing algorithms. Again, have more than one layer of protection - encrypt your data, set a BIOS passwords, etc. A compromised password = compromised data.

Thursday, July 17, 2008

Firefox 3.0.1 ThinApp Released!

I have made available a new version of my Mozilla Firefox ThinApp. This release updates Firefox to 3.0.1 and is built upon VMWare ThinApp 4. As usual, this build contains integrated Flash 9 and is fully supports the default update method. Barring any major/critical updates of the ThinApp virtualization software, I will not be releasing any more Firefox 3.0 builds.

Download now @ Skydrive (13.7MB)

MD5: 8BF613BC1AAA8143C695A66E1874A406

Wednesday, July 16, 2008

MediaMonkey Thinstall

Following my review of MediaMonkey, I have decided to make a portable-friendly version of MediaMonkey. Like my other Portable Apps, simply throw on a USB drive and take your music on the go.

Enjoy!

monkey-logo

DOWNLOAD: MediaMonkey.exe (v3.0.3.1183)
MD5: C1A9C5DD1FDAF24E94C80363EBCF8DA0

MediaMonkey 3.0 vs. WMP 11: Not Even Comparable

Ever since I got a @uchicago.edu email account and found out about Ruckus, a free music site for college students, I have been downloading music en masse. Currently have more than 5GB of (mostly classical) music. Initially I tried organizing everything using the Library function of Windows Media Player (WMP) 11. But as I deleted, moved, and renamed music files, I found that WMP's basic capabilities just weren't up to the task. The most glaring omission was the lack of reliable auto-updating of the Library. I often found myself looking at nonexistent library entries that pointed to nonexistent files.

Wmp_logo_for_vista
WMP 11: EPIC FAIL

Naturally, being a "there's always a solution to everything"-type of person, I set out to find the perfect program for reliably and efficiently managing and playing my now-immense music library. From friends and Googling I came across MediaMonkey, billed as a "Free Media Jukebox, Music Manager, CD Ripper & Converter". First, a rundown of its features and specs. It has the standard set features - tagging, playing, burning, and ripping. As any decent music program should, MediaMonkey encodes MP3s, monitors podcasts, and can sync with portable players, including iPod (take that, iTunes users!) While Windows Media Player claims to monitor your music folders, MediaMonkey actually does it. The Standard (free) version can rescan your music and update the library accordingly, while the Gold version raises the stakes by doing constant auto-monitoring. When I deleted a music file off my hard drive in Windows Explorer, MediaMonkey got rid of it in the library only a few seconds later. This really comes in handy if you're the type of person who likes to always manipulate files. By contrast, Windows Media Player never seems to reliably refresh the library (there isn't even a button for that).

mm_filemon
File monitoring options in MediaMonkey

So how well does MediaMonkey actually manage a library of music? By poking around I concluded that the library database system is powered by SQLite, the premier free and open-source library for implementing a high performance embedded SQL database. SQLite is also a key component of Firefox 3, Mac OS X, and the iPhone. The MediaMonkey website claims the ability to handle a library of 100,000+ songs, something I have no reason to doubt. I would hate to see WMP try to struggle through that many songs.

Music is meant to be played. Sure, Windows Media Player does that without a hitch, but nothing more. In WMP, playing one song from the Library will add a few (25 or so) songs to the "Now Playing" list. Obviously, this severely limits variety if you just want your music to keep playing. In MediaMonkey, however, all songs from the current category (Artist, Album, Genre, Composer, etc.) This ensures that you are not limited to the skewed whims of a random number generator.

mm_library1
Screenshot of MediaMonkey playing from an automagically generated Now Playing list of all my Andre Rieu songs

I also tested memory usage for both WMP and MM. While playing WMP rang in at 38,672K, while MediaMonkey registered 29,308K. Not only does WMP suck, it also uses more memory!

Of course, functionality isn't the only thing. An attractive user interface and cool visualizations are always nice bonuses. MediaMonkey excels in both these areas. The MM website has a collection of installable themes, including one that slaps WMP 11 across the face. There are also add-on visualizations, many of which take advantage of hardware 3D graphics acceleration. Besides eye candy, MediaMonkey's plug-in architecture allows for various other functional enhancements, including playback and encoding support for other audio formats.


WMP 11 or MediaMonkey?

I could go on and on about the various nifty features of MediaMonkey, but I'll keep it simple: IT'S AWESOME. WMP 11 simply can't hold a candle to MM's sheer power. Novices and casual users will find the Standard version more than adequate, while audiophiles will find the paid Gold version well worth their money.

Saturday, July 12, 2008

Retrieving Windows Password Hashes using Backtrack 3 - A Walkthrough

WARNING: The procedure outlined here is NOT intended for casual n00b users. If you don't get it, don't do it. Experience with Linux is highly recommended to understand this tutorial.

Let's say that you forgot your Windows password...or that you need to get at another user's for legitimate (pentesting?) purposes. Assume the following:

  • The Windows installation has passwords on all local accounts, including the administrator.
  • As a result, you will not be able to use Windows to recover the password hashes.

So what now? The solution is to use another operating system to gain access to the Windows partition on the hard drive. Linux, with its now-strong NTFS support, is ideal for this task. Today, I'll be showing you how to use the Backtrack 3 Linux distribution and samdump2 to access and dump the SAM file on Windows XP and Vista. The instructions that follow detail installing BT3 on a USB stick through Windows - if you're going for your own password, then have another computer available.

Obtain and install Backtrack 3 onto a USB drive (not CD!)

    • You will need a 1GB or larger drive.
    • http://www.remote-exploit.org/backtrack_download.html
    • Extract the downloaded ISO file to the root of your USB stick using something like WinRAR or IZArc.
    • Navigate to the boot directory. Run bootinst.bat to install the bootloader on your USB. Make sure you run this from your USB and NOT from your local hard drive - otherwise, you will end up not being able to boot Windows anymore!


    Install samdump2 v2.0.

      • samdump2 is a Linux tool for decoding the Windows SAM file and undoing SYSKEY encryption. Backtrack 3 actually contains version 1.1, but this version is comprised of two separate programs which is less user-friendly. The latest version combines both SYSKEY decryption and SAM reading into one program.
      • I have compiled an LZM module which will update Backtrack 3 with the latest version. Put the module file in BT3/modules.

    Start BT3.

      • Restart your computer and boot to the USB device (you may have change your BIOS boot settings).
      • You should see the following menu: bt3_boot
        The fancy Compiz graphics are not needed. In fact, we could do with just a command prompt. I recommend choosing either BT3 Graphics mode (KDE) or BT3 Text mode Frame Buffer.
      • If Backtrack 3 does not automatically login, use root and toor as the username and password, respectively.

    Perform the dump.

      • If you are using graphical mode, open a shell window from the menu bar.
      • Type df. This command gives you a listing of all mounted filesystems. Your Windows partition should be among the output; make note of the corresponding device name "Mounted on" column - for example, hda1 from /dev/hda1.
      • Now enter cd /mnt/DEVNAME/WINDOWS/system32/config. Replace DEVNAME with your device name - I am using hda1 in the example, so I would type cd /mnt/XXX/WINDOWS/system32/config.
      • Type ls to list the contents of this directory. Verify that the files SAM and system among the listing.
      • Now type samdump2 -o ~/winhashes.txt system SAM to undo the SYSKEY protection and dump the SAM. A copy of the hashes will be stored to winhashes.txt in the user home directory.
        bt3_samdump2
      • Simply copy this text file to your same USB stick or use Backtrack 3's Firefox to email or upload it.
      • The hash file (see below) is in standard pwdump format. Many password-cracking tools can handle this, such as John The Ripper and ophcrack.bt3_vi

    This method demonstrates Windows' inherent lack of password security. By default, Windows NT, 2000 and XP store the hash using LM, which is quite insecure and easily defeated. Windows Vista uses the more secure NTLM hash. But regardless, make sure you use a strong password that is reasonably long and contains numbers and/or symbols. However, password-dumping attacks like this can be effectively thwarted by setting a BIOS/boot password so that the computer cannot be started without authorization. It is fair to say that many or most people have no such security on their computers short of locking their computers when they go out. Unfortunately, though, the Windows password provides a false and inflated sense of security and privacy.