Found something useful? Don't forget to leave a comment!


Thursday, February 28, 2008

Build Your Own Encrypted SSH Tunneling Toolkit - Defeat Filters, Firewalls, and More - Part 2

In Part I, we covered the task of setting up the SSH server itself. Today in Part II, we will explore how to tunnel through the remote SSH server. These instructions are written with Microsoft Windows in mind since the vast majority of computers encountered are Windows-based. For maximum portability, the necessary tools will be run from a USB flash or hard drive; a 512MB or greater USB 2.0 drive is recommended.

Set up PuTTY

To set up the SSH tunnel, we will be using the excellent PuTTY client. We will be using the Portable version of PuTTY, a release packaged by the folks over at Portableapps.com.

Download here.

Run the installer to load PuTTY onto your USB drive. Start PuttyPortable.exe. The next step is to set up the SSH connection and tunnel.

The first step is to enter the address of your router (the DynDNS address mentioned in Part 1). Ensure that the protocol type is SSH, and make sure you change the port number to 443.

The next step is to set up the dynamic SOCKS tunnel. Go to the Connection->SSH->Tunnels menu. In the source port box, specify a port greater than 1024 (<1024 style="font-weight: bold;">"Dynamic" radio button. Finally, click Add. The tunnels screen should look something like this when finished:

Now go back to the main screen (see first screenshot). You probably want to save the current settings as a profile - this allows quick connections in the future.

With everything set up, it is time to connect. Hit the Open button at the bottom of the PuTTY dialog. You should be greeted with a terminal window now - type in the router's username and password as requested. A successful connection should look similar to this:

Leave this open as long as you want to use the tunnel. Type exit when finished.

Set up applications to use the tunnel

Well, you ask, how do I actually start tunneling things through? The tunnel you created is basically a SOCKS proxy. SOCKS is a protocol for proxying just about any type of data. Many applications support communicating through a SOCKS proxy (Firefox, Pidgin, etc.)

Use the following values when configuring applications to use the tunnel:

  • Proxy type: SOCKS 4/5 (if you mistakenly select another protocol, such as HTTP, IT WON'T WORK!!!)
  • Proxy address: localhost (or the loopback IP address 127.0.0.1)
  • Proxy port: whatever you chose as the tunnel's port number in PuTTY)

Load Up Your USB Drive with Apps

For even more convenience, it is a good idea to put some additional programs on your USB drive that can take advantage of the SSH tunnel. For example, I currently have Portable Firefox on my USB drive, complete with the FoxyProxy extension for easy, on-the-fly switching between direct connect mode and SSH tunnel mode. This makes web browsing and bypassing filters a snap - I just plug it in and go, with the added bonus of a fully customized Firefox environment, with my bookmarks and homepages all right there. I also have the Pidgin IM client installed on my drive - see this page for more details on enabling its portable function.

With the SSH tunnel, you will be able to securely use any protocol and any application, as long as it supports the use of SOCKS. The freedom of the web is awaiting...and as an added bonus, no one will be the wiser to your encrypted activities.

Wednesday, February 27, 2008

How NOT to encrypt your files

I had recently encrypted all the files on my USB drive with TrueCrypt. I was getting a little paranoid about losing it and having other people root through my stuff.

Unfortunately, TrueCrypt requires admin privileges to run - not a big deal at home, but a major obstacle at school. I learned this the hard way. I was asked by a teacher to show a YouTube video for the class, since that site is blocked. Before I encrypted everything, I could do this without a hitch. Portable Firefox with my favorite add-ons and Flash 9 via an SSH tunnel...bliss. Well, who was the idiot that decided NOT to give the teacher accounts local admin privileges?! I was basically locked out of my own stuff simply because I couldn't use TrueCrypt. What should have been a routine task turned into a fiasco and a hit to my rep.

So I've chosen to compromise convenience and security. All my documents are still encrypted, but I moved the apps into open space. Better luck next time...

Build Your Own Encrypted SSH Tunneling Toolkit - Defeat Filters, Firewalls, and More - Part 1

SSH has traditionally been a console protocol, but today it is used for many other purposes besides the text-only command line. The most useful of these features is port tunneling - the ability to tunnel arbitrary data ports through the remote computer. Naturally, everything is encrypted, which makes SSH and everything it tunnels impossible to eavesdrop on (a bunch of gibberish, random-looking data).


So why would you want to use SSH tunneling? Here are a few common purposes:

  • bypass restrictive web filters or firewalls :)
  • encrypt unsecure data (e.g. email traffic); prevent eavesdroppers
  • use your home internet connection from abroad

Today I will show you how to construct your own SSH tunneling system setup, accessible from anywhere you have internet access. The system is composed of two parts: the SSH server (I will show how to set this up on a Linksys WRT54G/GS router using Tomato firmware) and the portable USB toolkit, which will be composed of the Portable versions of the PuTTY SSH client and common internet applications, such as the Portable Firefox browser or Pidgin IM client.

What You Will Need

  • Linux-based Linksys WRT54G/GS/GL router (beware of the castrated VxWorks-based models!)
  • Tomato router firmware
  • Home/office broadband internet connection (1.5Mbps or greater works well)
  • a DynDNS account (so the router can have an easy-to-remember hostname)

Part 1 - Set up the SSH Server

Using the router as the SSH server is the most practical option, for several reasons. First, it is always-on and reliable, considering that the average person does NOT run a dedicated always-on server in their home. Second, configuration is naturally easy since the router is already hooked up to the internet connection.

I recommend Linksys routers because they are probably the most common home router out there, and because they are ridiculously easy to hack (Linksys released the specs under the GPL!)

This is where custom firmware comes in – adding extra features and capabilities, such as the embedded Dropbear SSH server we will be taking advantage of. I recommend Tomato because I have found it to be one of the lightest and fastest firmwares (the slick SVG graphs don’t hurt, either).

Flashing the firmware (if you aren’t already running some form of third-party firmware) is relatively straightforward and will not be covered in this tutorial. To put it bluntly, if you can’t figure out how to do it, it’s probably not the brightest idea to continue…

Navigate to the router’s web interface, typically http://192.168.1.1. Click the “Administration” tab at the left. You should be at the “Web Admin” page. Scroll down until you see the “SSH Daemon” options. Check both “Enable at Startup” and “Remote Access”. Change "Remote Port" to 443, while "Port" should be left at the default of 22. Click "Start Now" if the SSH server isn't already started. See the image below to double check your settings.

Port 443 is typically used for HTTPS, and is usually left open even in web filters and firewalls due to its widespread use on the internet (think banking, shopping, secure websites, etc.) Since both SSH and HTTPS are encrypted protocols the filter/firewall won't be able to tell what the traffic really is...are you managing your bank account, downloading porn, surfing YouTube? To a filter or firewall, it's all good.


The next step is to set up the dynamic DNS. Register for a free DynDNS account.
In the DynDNS account manager, create a new IP redirect hostname.
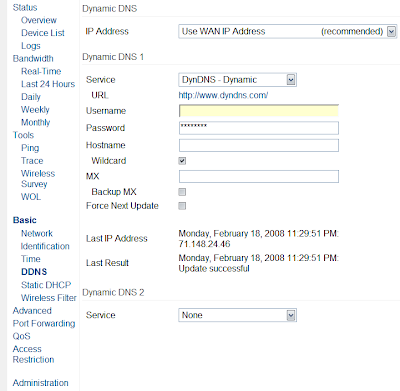
Go back to your Tomato web interface, and go to the Basic->DDNS menu.
Input your DynDNS username, password, and hostname. See the image below for recommended options.

With the dynamic DNS, you will have an easy-to-remember hostname that you will use to connect back to your router.

When we continue in Part 2, I'll detail how to set up a USB drive with portable programs to use your SSH tunnel anywhere, anytime.

Saturday, February 23, 2008

Change of hosting service

After taking a look at the new Blogger, I decided it was much better than Wordpress. The old Wordpress will still remain up, however all new posts will go up on Blogger.

Liberating Your Online Radio - How To Live Record Internet Music

Online radio is wonderful, allowing us easy, legal, instant access to our favorite artists and songs. Last.fm recently made headlines, announcing the availability of full tracks. But there is, of course, a catch, as there is with any other cool service: the inability to save or download the tracks. It's a simple matter of business and profit: by only allowing you to play tracks, they ensure a cash cow for themselves - listeners have to keep coming back to hear music - as well as protecting the financial interests of the artists themselves. Miley Cyrus doesn't sing for free, does she? I admit, this is a vastly oversimplified perspective, but us people, the music consumers, only care about getting the music - right?

Today, I'll be showing you how to live record online radio into tangible, I-get-to-keep-it MP3 files. I'll be using the uber-popular Last.fm site as the example. To handle the recording portion, we will be using the excellent, free and open-source program Audacity. For the MP3 creation, we will couple Audacity with the just-as-excellent, also free, defacto standard of MP3 encoders, LAME. Without further ado, let's get started!

Install + Configure Audacity and LAME

We will be using the latest version, which is 1.3.4 Beta. Download here. For most users on modern systems, the Win2000/XP/2003/Vista EXE installer is recommended. Run the installer and accept the default installation parameters.

The next step is to install the LAME MP3 encoder. Due to patent restrictions and legal concerns, the LAME binaries are not bundled with Audacity. Binaries aren't even provided by the LAME developers - just the source code. So we must look to third parties to pick up a few binaries (unless you feel inclined to compile some source...)
http://www.rarewares.org/mp3-lame-bundle.php
You can choose between the 3.97 stable build or the 3.98 beta 6 build - in my experience both are stable enough for general use. Once you have downloaded the ZIP file, unpack lame_enc.dll to a location of your choice, preferably the installation directory of Audacity: c:\Program Files\Audacity 1.3 Beta (Unicode)

Now start up Audacity. If an info popup appears, just click OK. Go to the Edit menu and click Preferences (or do CTRL+P). In the window that appears, select the Audio Files tab...audacity-lame.jpg

Now click on Find Library as shown above. Point the dialog to the location of your lame_enc.dll. The window should now be showing the version of the LAME library you have. Close the Preferences window when finished.

The next step is to prep Audacity's recording source. We want to record whatever is coming out of the speakers. Any half-decent sound card, even most integrated sound chips, should be able to do this.audacity-recsource.jpg

You should be seeing the Audacity main window. Look to the top right of your screen. There is a dropdown box that allows you to choose your recording source. Choose the input that represents your sound output - on my sound card, the appropriate source is called "Stereo Mix". Yours may be called "What-You-Hear", "Mixer Output", etc. We are basically taking input from the output. There is always the oddball sound card that does not support this feature - if so, you're out of luck unless you go buy a better sound card.

Recording the Music and Making the MP3

Well, here comes the fun part. Go to your favorite online music site. For example, Last.fm:

lastfm.jpg

Make sure your volume control is NOT muted. Go to your Audacity window and hit the big record button on the top toolbar, or R on your keyboard. Switch as fast as you can to the music player and start playing it there. If everything is setup up correctly, you should see sound waves appearing in Audacity:

audacityrec.jpg

Once the music stops, simply hit the stop button to stop recording. There will probably be some blank space at the beginning due to playback/recording delay. If you want to get rid of it, just highlight it with your mouse and use Edit -> Delete (CTRL+K).

Finally, the last step: making the MP3. Go to File -> Export. A file save dialog will appear. You can use the Options button to fine tune the parameters of your MP3, such as bitrate, stereo modes, etc.

audacity-save.jpg

Congratulations! Internet radio is now YOUR music, anytime, anywhere, online or offline. By having a real file, you have a tangible, permanent recording to enjoy.

Birth of the Blog

And today, February 9, 2008, whitehat2009 (that's me) broke ground on his new blog at whitehat2009.blogspot.com.

I should probably start out with some of the philosophy of this blog. In a few words, it's a blog about life, whitehat 1337ness, and interesting trends.

I'll write whenever I have time, which may not be a regular schedule.

Off I go...